HtmlWebpackPlugin은 웹팩이 html 파일을 읽어서 html 파일을 빌드할 수 있도록 해 줌
기존에는 빌드 결과물 폴더인 dist 폴더에 index.html을 만들어사용했지만 빌드 전 폴더인 src에서 html을 다룰 수 있게 됨
- 패키지 설치
$ npm i -D html-webpack-plugin
- webpack.config.js 설정
// webpack.config.jsconst path =require("path");// html-webpack-plugin 패키지에서 HtmlWebpackPlugin 가져오기const HtmlWebpackPlugin =require("html-webpack-plugin");
module.exports ={mode:"development",entry: path.resolve(__dirname,"src/index.js"),output:{path: path.resolve(__dirname,"dist"),filename:"main.js",},module:{rules:[{test:/\.s[ac]ss$/i,use:["style-loader","css-loader","sass-loader"],},],},// plugins 배열 안에 plugin들 추가plugins:[// 플러그인을 다양한 용도로 여러 번 사용하기에 new 연산자로 호출하여 플러그인의 인스턴스를 생성하여 사용newHtmlWebpackPlugin({// dist 폴더에 결과물로서 생성할 파일이름filename:"index.html",// 플러그인이 처리할 템플릿template:"src/index.html",}),],};
- src/index.html 작성
예시 코드 작성
<!--src/index.html--><!DOCTYPEhtml><htmllang="en"><head><metacharset="UTF-8"/><metaname="viewport"content="width=device-width, initial-scale=1.0"/><title>Document</title></head><body><divclass="grid"><divclass="card card-image"><divclass="image"><imgsrc="https://source.unsplash.com/random/410x230"/></div><divclass="body"><divclass="wrap"><h3class="title"><ahref="#">This is a title and can be in one or two lines</a></h3><buttonclass="btn">Click</button></div></div></div></div></body></html>
- index.html 빌드 확인
npm run build 명령어 실행 시, dist/index.html로 빌드되는 것을 확인 할 수 있음
script 태그로 dist/main.js를 받는 것을 볼 수 있음
<!--dist/index.html--><!DOCTYPEhtml><htmllang="en"><head><metacharset="UTF-8"/><metaname="viewport"content="width=device-width,initial-scale=1"/><title>Document</title><!--dist 폴더의 main.js가 import되고 있음--><scriptdefer="defer"src="main.js"></script></head><body><divclass="grid"><divclass="card card-image"><divclass="image"><imgsrc="https://placeimg.com/410/230/any"/></div><divclass="body"><divclass="wrap"><h3class="title"><ahref="#">This is a title and can be in one or two lines</a></h3><buttonclass="btn">Click</button></div></div></div></div></body></html>
- 스타일링 빌드
src/styles/main.scss 파일은 어떤 과정으로 빌드되고 있을까?
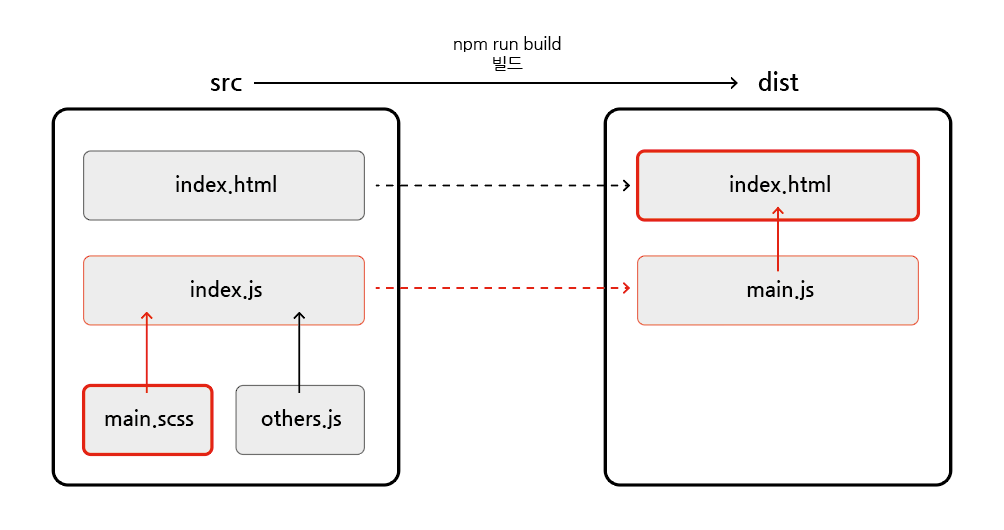
scss 파일이 빌드 파일로 import되는 과정
scss 파일은 src 폴더의 index.js 파일로 import됨
src 폴더의 index.js 파일은 빌드 과정을 통해 dist 폴더의 main.js로 빌드됨
빌드된 main.js는 빌드된 index.html 파일로 최종적으로 import됨
즉, src/main.scss 파일을 작성한 후, 빌드를 하면 바로 위의 연결을 통해 최종 dist의 index.html에 적용됨
//src/main.scssbody {background-color: #ccc;padding: 48px;font-size: 16px;}$font-primary: sans-serif;$color-primary: #fa625d;$color-black:rgba(0, 0, 0, 0.9);$color-white: #ffffff;$color-primary-30:lighten($color-primary, 20%);$color-primary-70:darken($color-primary, 10%);$color-black-30:lighten($color-black, 20%);// for the card$background-card:$color-white;// for the tag$font-tag-label:$font-primary;$color-tag-label:$color-primary;// for the title$font-title:$font-primary;$color-title:$color-black;// for the card sass.card-image {background-color:$background-card;position: relative;max-width: 400px;.image {line-height: 0;margin-top: -34px;position: relative;z-index: 1;img {max-width: 100%;}}.wrap {padding: 0 1em 1.5em 1em;text-align: center;}.title {font-family:$font-title;font-size: 1.5em;margin: 8px 0 16px;line-height: 1.3;a {color:$color-title;text-decoration: none;&:hover {color:$color-black-30;transition: all 0.6s ease;}}}.btn {background-color:$color-primary;color:$color-black-30;border: 0;border-radius: 10px;box-shadow: 0 5px 15px rgba(0, 0, 0, 0.1), 0 6px 6px rgba(0, 0, 0, 0.1);padding: 14px 40px;font-size: 16px;cursor: pointer;&:active {transform:scale(0.98);}}}